Info
How Are Energy Savings Calculated
PowderWatts savings reflect the electricity your roof heat cable would have used
if left on continuously, compared to what it actually used while being intelligently
controlled by our system during that month.This is not a flat estimate or a fixed amount per circuit. Savings are calculated
from real operating data from your property for that specific billing period.
if left on continuously, compared to what it actually used while being intelligently
controlled by our system during that month.This is not a flat estimate or a fixed amount per circuit. Savings are calculated
from real operating data from your property for that specific billing period.
We only run your system when it’s actually needed
Many heat cable systems are left on for long stretches “just in case.” PowderWatts
continuously monitors conditions and operates the system only when ice-dam risk
is present — preventing unnecessary runtime and wasted energy.
Energy use changes with temperature
Most modern roof heat cable is self-regulating (adaptive). Instead of drawing
a fixed amount of electricity, the cable automatically adjusts its heat output
based on temperature along the roofline.
- Colder conditions → cable produces more heat → higher electricity use
- Milder conditions → less heat needed → lower electricity use
This happens because the cable’s conductive core changes its electrical behavior
as temperatures change. When the cable is cold, more current flows and energy use
increases. As it warms, current drops and energy use falls.
As a result, energy consumption can vary significantly from hour to hour depending
on weather conditions. The same system may use substantially more electricity during
a cold snap than during a mild period.
PowderWatts accounts for this by using actual operating data from your system
during the billing month rather than assuming a single fixed power level.
How we estimate avoided energy use
We analyze real operating samples from your system and apply statistical smoothing
to produce a stable, conservative estimate:
- Extreme high and low readings are removed to eliminate anomalies (such as startup spikes or unusual conditions)
- A representative high-normal value (approximately the 90th percentile) is used to reflect typical heating demand during cold weather
We then determine how long the system was safely OFF during the month:
- Total hours in the billing month
- Minus hours the heat cable was actually ON
- Minus any hours without system reporting
The remaining hours represent time the system was OFF but would typically have
been left ON in a conventional setup. Those avoided hours are multiplied by the
representative energy use to estimate electricity saved.
PowderWatts devices are designed to report every hour, every day. If a temporary
connectivity issue occurs, those hours are conservatively excluded from savings
calculations — effectively assuming the system may have been ON — which reduces,
rather than inflates, reported savings.
How savings turn into dollars
Once avoided energy use is estimated, we apply the applicable local utility rate
to determine the dollar value of the electricity not consumed during that period.
Why savings can still be high in a mild winter
Even during mild winters, heat cable is often left energized for long periods.
PowderWatts eliminates that unnecessary operation and runs the system only when
conditions truly require melting. Mild seasons frequently include long shoulder
periods where cable would otherwise remain on continuously without providing
benefit — creating meaningful savings.
DIY Installation of the PowderWatts System
Thank you for choosing PowderWatts. Your equipment has been pre-configured for simple self-installation. In most cases, setup requires only plugging in the hub, positioning the devices, and confirming signal strength in the mobile app.
1) What do I need to do before installation?
Before installing your equipment:
- Download the PowderWatts mobile app using the link provided in your welcome email
- Create your account and log in
- Ensure you have received all equipment listed in your shipment
- Confirm you have access to power where the hub will be placed
If you did not receive the app email, please contact support.
2) How do I install the hub?
- Place the hub indoors near a power outlet
- Plug the hub into power
- Allow several minutes for the hub to boot
Network Connection Options
Option A — Ethernet (Recommended)
If you connect the hub directly to your home router using an Ethernet cable:
- No additional configuration is required
- The hub will automatically connect to the internet
Option B — Wi-Fi (No Ethernet Cable)
If you plan to use Wi-Fi:
- Follow the instructions in the FAQ: Resetting Your Network Name and Password
- You will need to configure your Wi-Fi credentials for the hub
3) Where should I position the hub?
The hub must be placed where it can reliably communicate with all devices.
In the app, check signal strength for each device. For proper operation:
- Camera signal should be –75 dB or higher (closer to 0 is better)
- Switch signal should also be –75 dB or higher
If signal levels are weaker than –75 dB:
- Move the hub closer to the devices
- Reduce obstructions such as walls, metal, or appliances
- Elevate the hub if possible
If adequate signal cannot be achieved from inside the building, the hub may be installed outdoors in a watertight junction box closer to the roof equipment.
Outdoor / Extended Placement Using PoE
- The hub can be connected via an Ethernet cable to a router or network switch that supports Power over Ethernet (PoE)
- PoE allows both electrical power and data to travel through a single Ethernet cable
- This enables safe installation in a sealed outdoor enclosure
- The Ethernet cable length must not exceed 200 feet
If adequate signal still cannot be achieved, contact support to discuss additional hub options.
4) When will the camera activate?
Once installed on the roof and powered, the camera will automatically wake up within approximately one hour.
Manual Activation (Optional)
You can activate the camera immediately using the included magnet:
- Locate the two clear windows on the side of the camera housing
- Identify the half-moon shaped window (not the square one)
- Swipe the magnet across the half-moon window
Important:
There are two windows — one square and one half-moon shaped.
Activation will only work on the half-moon window.

No manual activation is required if you prefer to wait for automatic startup.
5) Where should the camera be installed?
Place the camera where ice buildup is most common during winter.
Recommended locations:
- Roof peak above heat cable runs
- Roof valleys
- Areas where melt channels typically form
Important:
The camera must have a clear view of the heat cables. If it cannot see the cables, it cannot determine whether a proper melt channel exists.
6) How do I secure the camera?
The camera can be mounted using either method:
- Roof-appropriate adhesive
- Waterproof screws (mounting points are located on the back of the camera)
Choose the method best suited to your roof type and local conditions.
7) What if device signals are low?
If any device shows weak signal (below –75 dB):
- Reposition the hub to improve line-of-sight
- Move the hub higher or closer to the affected device
- Recheck signal strength in the app
If repositioning indoors does not resolve the issue, consider outdoor placement using a watertight enclosure and PoE as described above.
If signal remains low after these steps, contact support to discuss additional hub options.
8) How do I know installation is complete?
Installation is complete when:
- The hub is powered and connected to the internet
- Devices appear in the app
- Signal strength is acceptable (≥ –75 dB)
- The camera begins reporting images
9) Need help?
If you encounter any issues during installation, our support team is ready to assist.
PowderWatts Support
Email: support@powderwatts.com
Phone: 801-477-7015
Your system will now automatically monitor conditions and operate as designed.
Thank you for installing PowderWatts.
For Installers
Camera Installation Training
In this training, we'll walk you through the steps to properly install a Powder Watts camera, including adding it to the Powder Watts app, connecting it to the hub, and attaching it to the roof.
Before you begin, make sure you have the following items on hand:
- Powder Watts camera
- Powder Watts app (available for download from the App Store or Google Play)
- Powder Watts hub
- Ladder
- Screwdriver
- Gasketed screws
With these items ready, let's get started.
Step 1: Scan the QR code to add the camera to the Powder Watts app. To do this, open the Powder Watts app and select "Add Camera." Hold your phone's camera up to the QR code on the back of the camera, and follow the prompts to add it to the app.
Step 2: Wake up the camera. To wake up the camera, hold a magnet next to the semi-circle on the side of the camera. This will turn on the camera and connect it to the Powder Watts hub.
Step 3: Test the camera. Before attaching the camera to the roof, make sure it is operational and taking images from the desired location. You can do this by checking the app to see if the camera's image is transmitting properly after waking the camera up for it to take an image.
Step 4: Place the camera in the desired location. Choose a location that will capture the worst ice dams for that section of heat cable. Each section should have its own camera.
Step 5: Attach the camera to the roof. Position the camera at the top of a heat cable loop, and attach it to the roof using the gasketed screws and adding sealant around each screw before setting the camera. One screw should be placed in the front hole, and one in any of the four back holes. Make sure the camera is secure and flush and the back flap of the camera should go under a roof shingle.
Step 6: Test the camera again. After attaching the camera to the roof, test it again to make sure the image is coming through properly in the app.
You have successfully installed a Powder Watts camera. If you have any questions or need additional assistance, don't hesitate to reach out to our customer support team.
Troubleshooting
How do I update my account?
To update your account please click the button below to be directed to the Customer Portal.

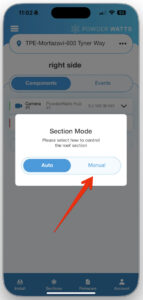
Manually control your heat cables
1- Select the sections tab at the bottom of the screen and then tap the button for the section you want to turn on

2- Click on Manual mode. This will change your system from being managed by PowderWatts, to being managed manually by you.
3- Select how long you want your system to be in manual mode, by selecting the end date and end time.
Note: the end time is selectable. Simply click on the time it is showing to select a new time. It defaults to 10 minutes but you can set any time you want. To set your system to manual mode indefinitely, select the More Options button and an option to set the system to manual mode indefinitely will be visible. Once you have your end date and time selected, press confirm.
Date Selection-
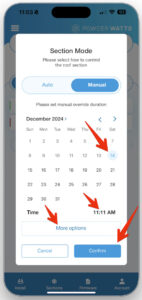
Time Selection-
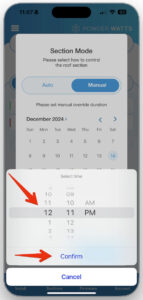
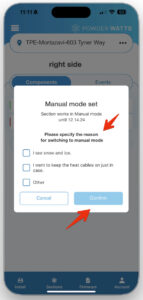
4- Select a reason for switching to manual and press confirm.
5- You can now manually control your heat cable by using the on off button (Red Arrow below)
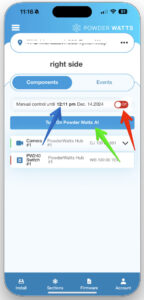
NOTE: Although it may give you options to turn the cables on for a period of time, you must manually turn them on or off. The timer function does not presently work. Your heat cables will be in manual control until the time specified (Blue Arrow). This is the time you selected in the steps above. At the end of this time, control will revert to Powder Watts to control your cables. To return your cables to automated control by PowderWatts, select the Turn On Powder Watts AI button (Green Arrow).
Resetting Your Network Name and Password
These instructions are for connecting a PowderWatts Hub to WIFI. If your hub is directly connected to your network, switch or router, you do not need to follow these instructions.
NOTE: Both versions of the PowderWatts Hub ONLY work with 2.4 ghz networks. If you have 5 ghz WIFI it will not work. Please ensure you are configuring your hub for a 2.4 ghz network.
There are 2 types of hubs. Version 1 and Version 1.5 as indicated below:
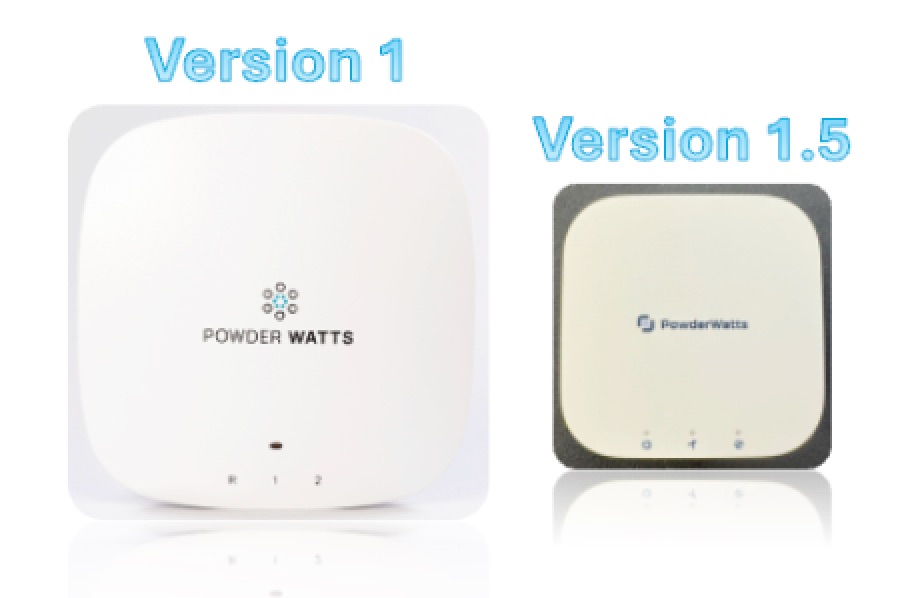
Version 1 is roughly 4" x 4". Version 1.5 is roughly 2" x 2"
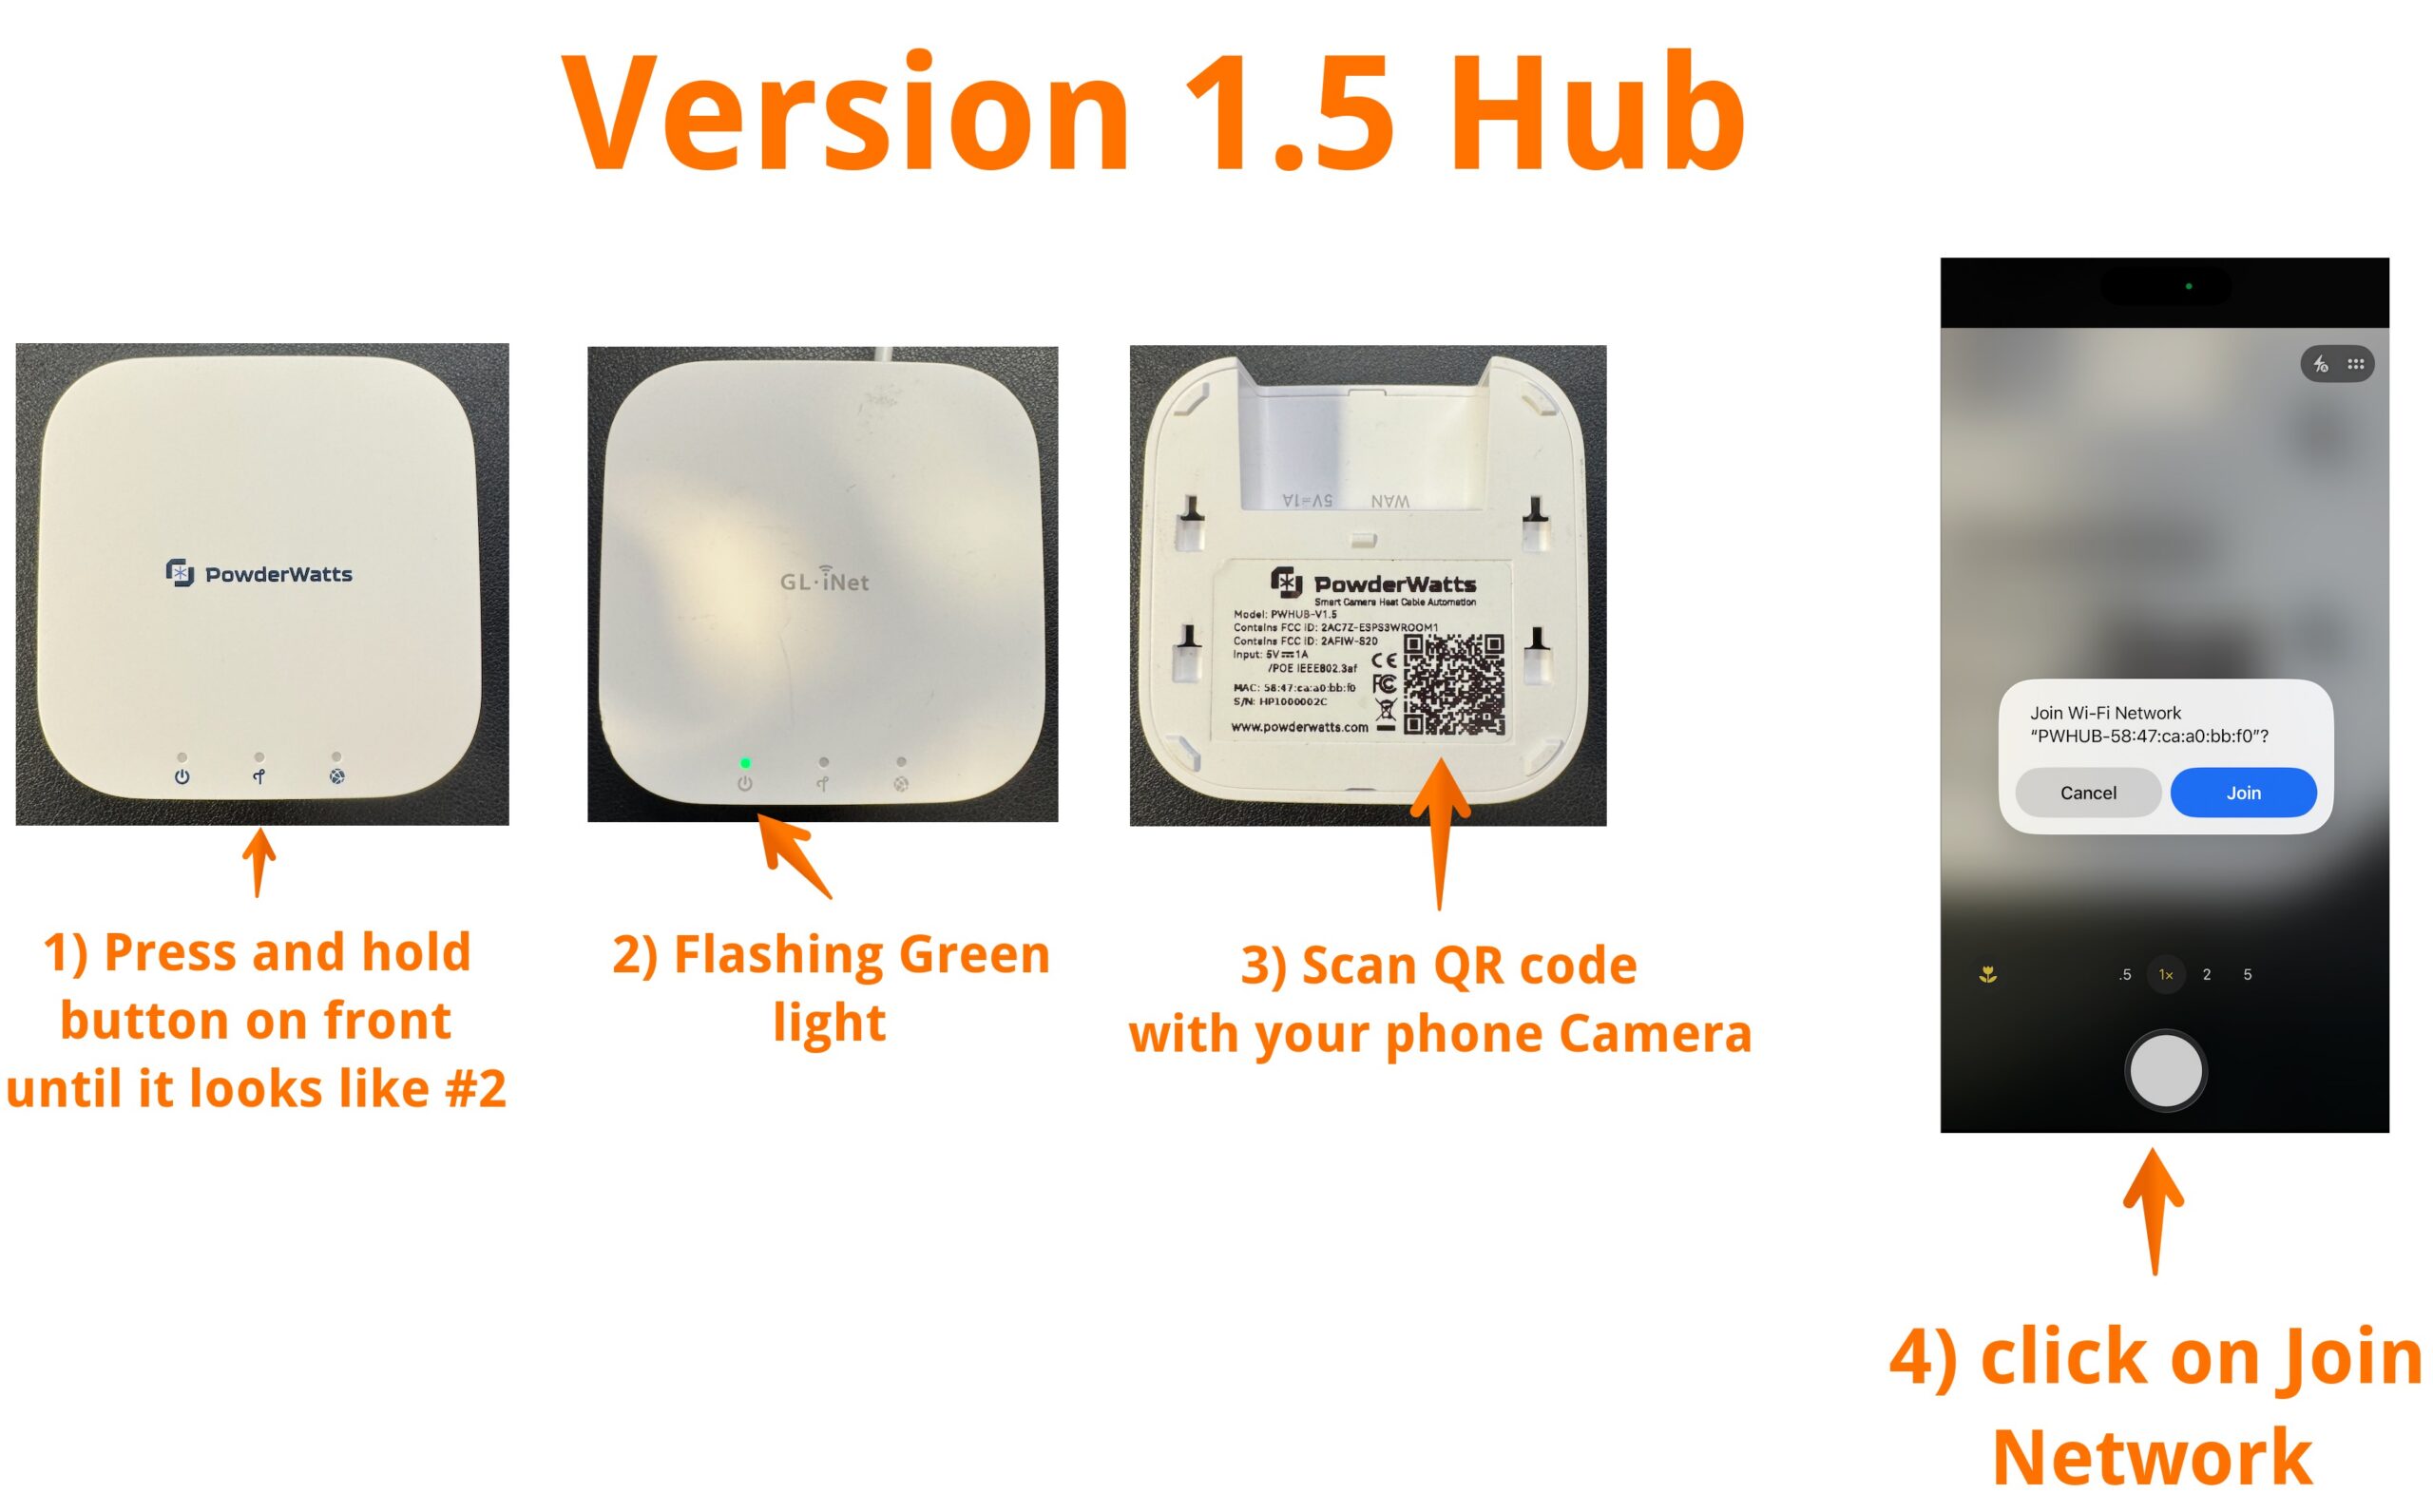
Version 1.5 Instructions:
Joining your hub to your local network involves three steps:
- Placing the hub in pairing mode
- Setting the WIFI login credentials on the hub
- Completing the WIFI setup
Step 1: Placing the hub in Paring mode:
To place the hub in pairing mode follow the instructions indicated below.
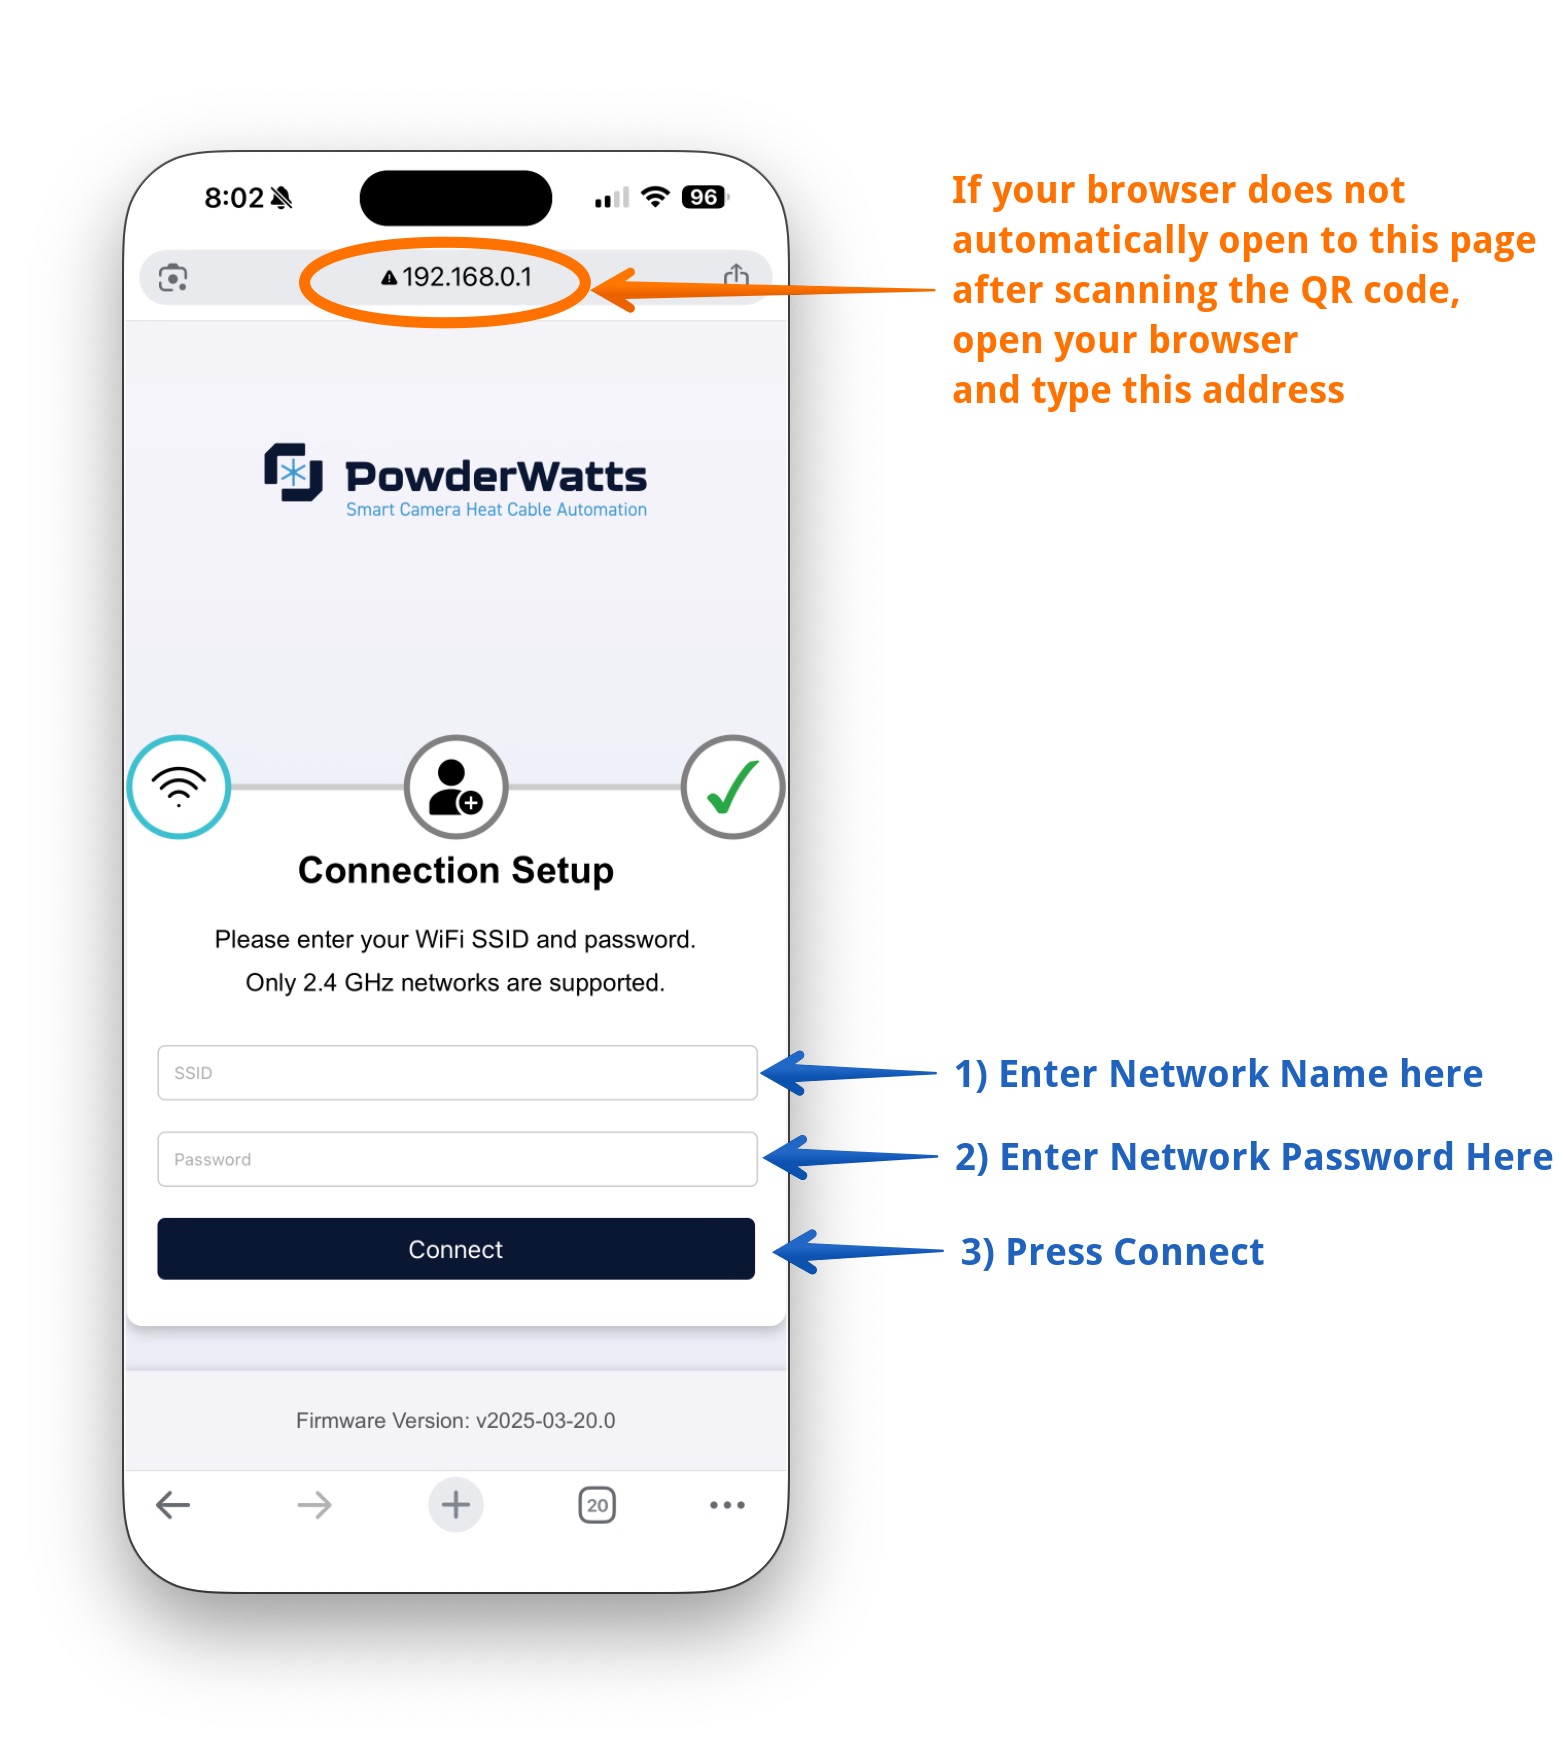
Step 2: Setting WIFI login credentials:
Once in pairing mode you should be placed in a browser window on your phone, similar to the image below. If you are not, simply open a browser after you have joined the network in step #4 above and type in 192.168.0.1 into the browser window. Then follow the instructions below:
Step 3: Completing the WIFI setup:
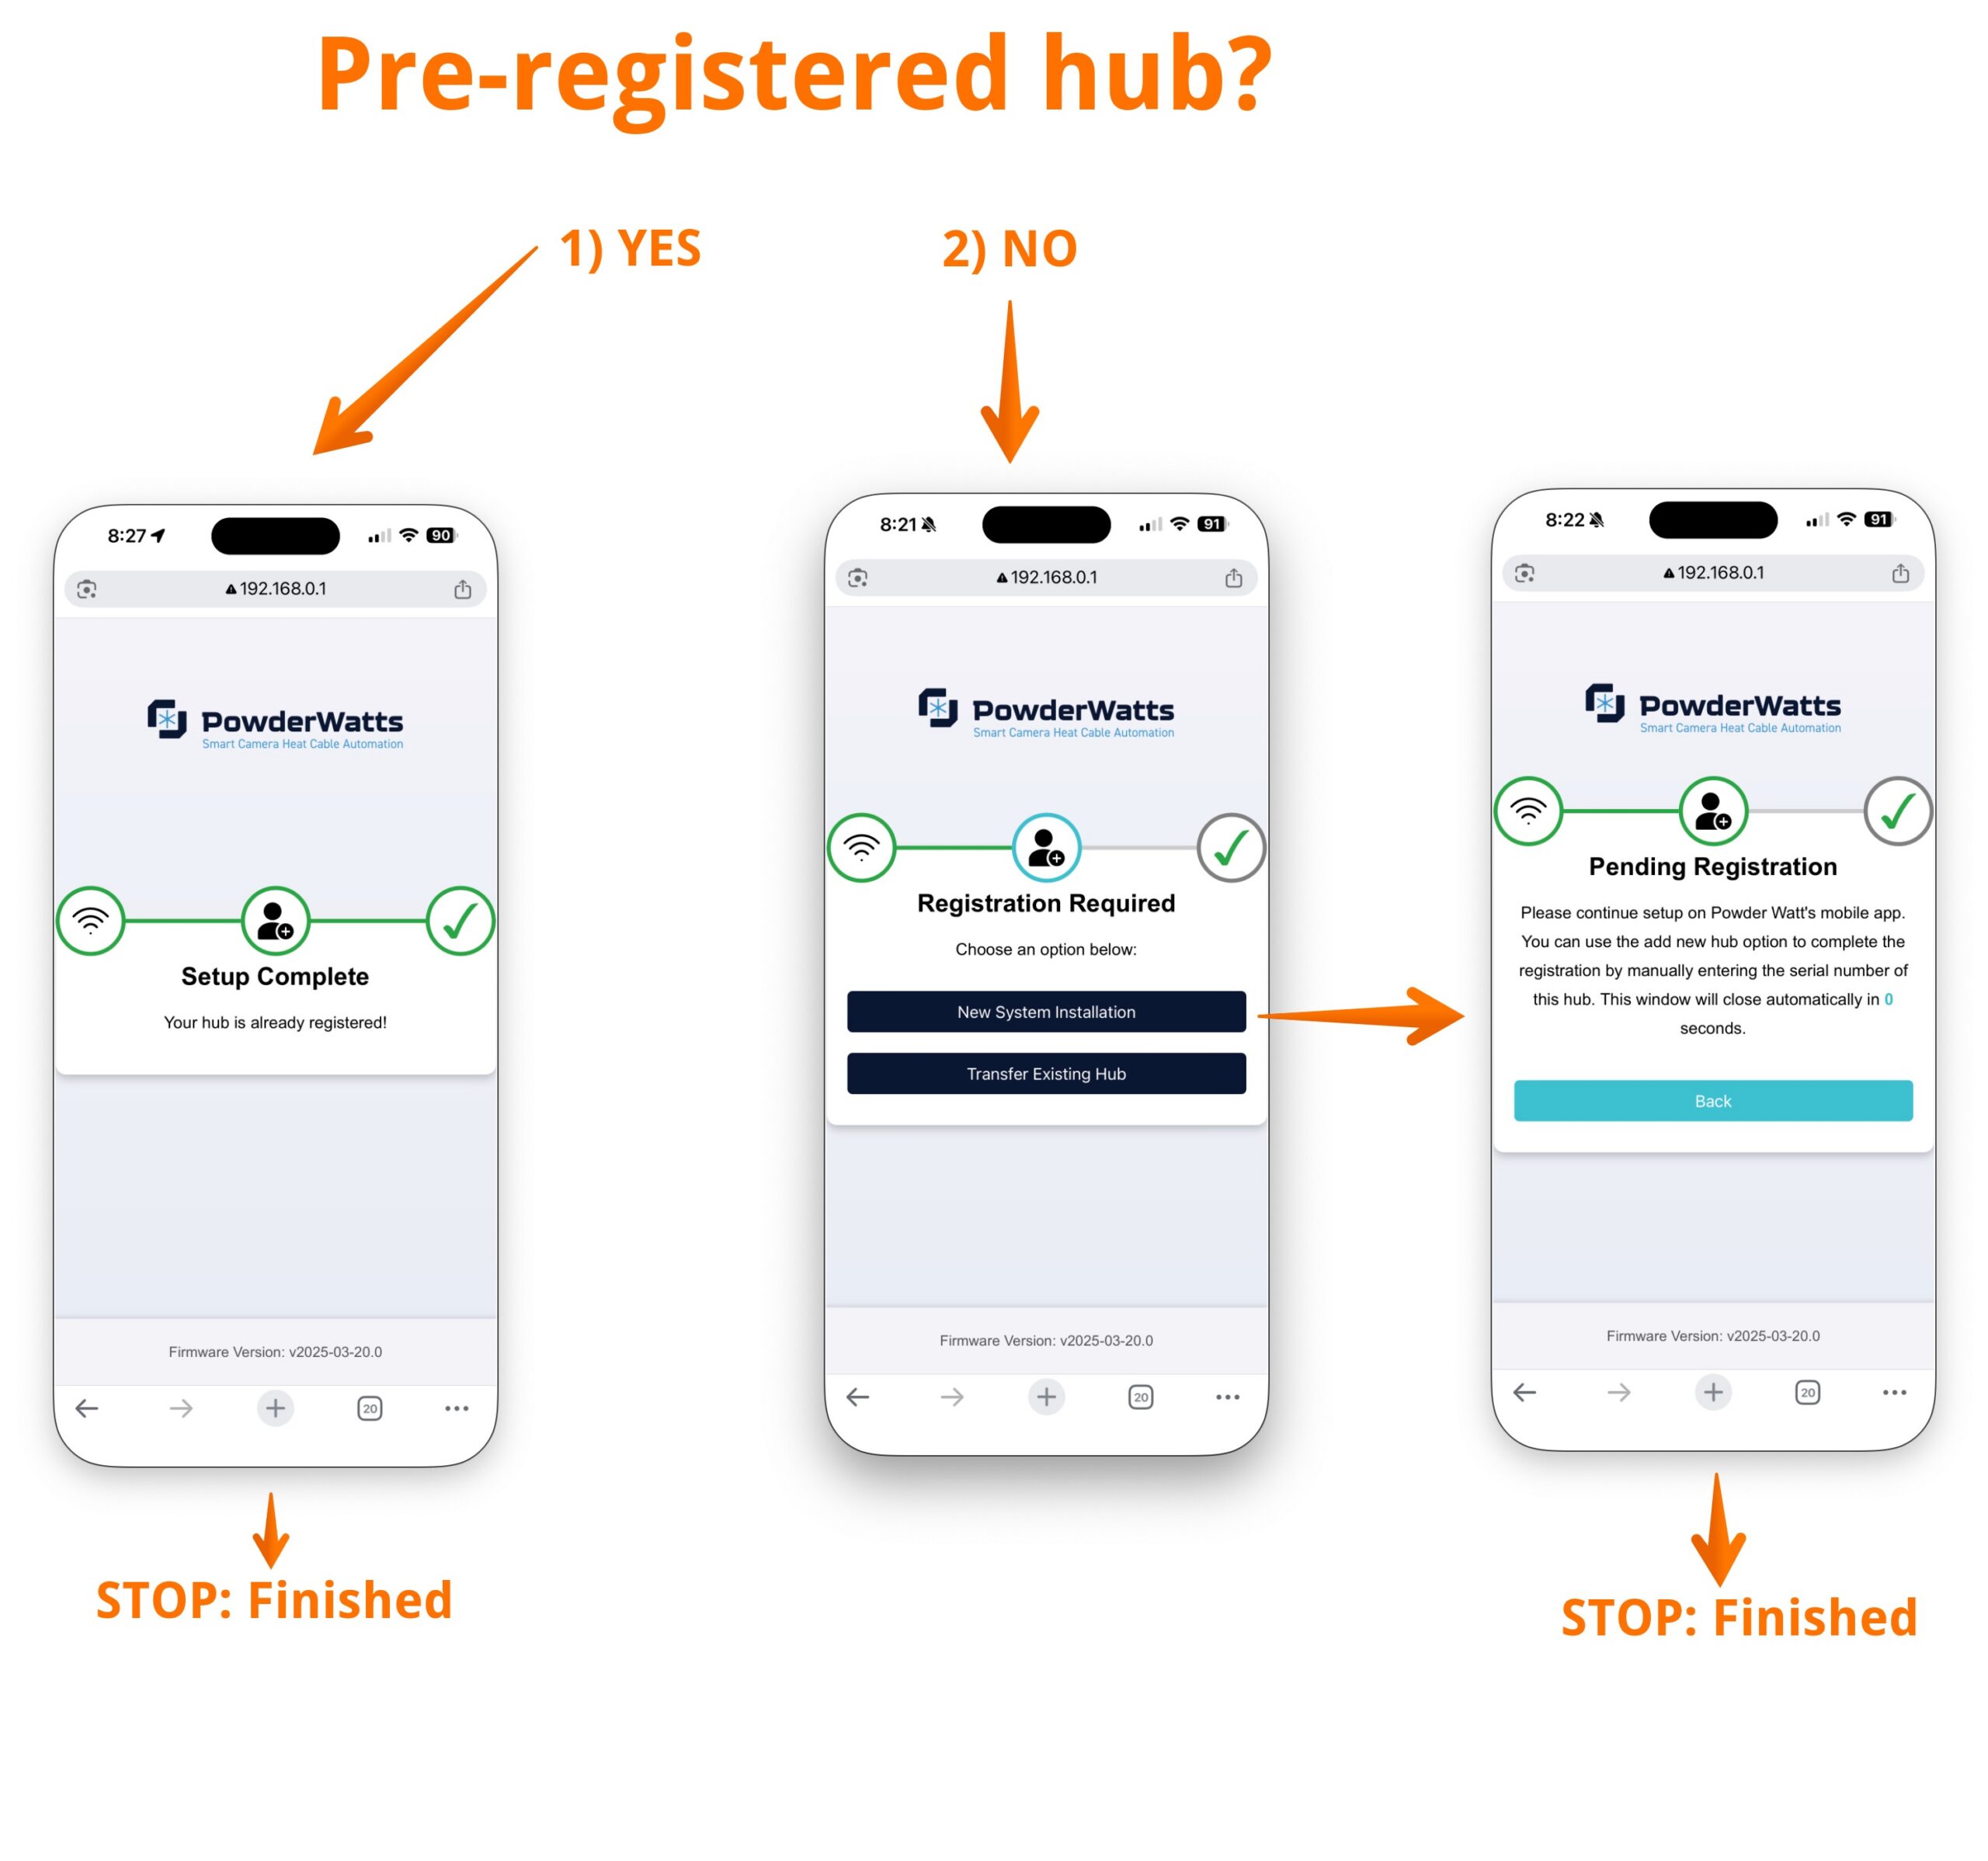
After pressing connect in step 2 above, you will receive one of the two following screens, depending on whether or not your hub was pre-configured. If it was preconfigured, you will receive path #1. If it was not, you will receive Path #2. In either case, once you have completed the connection, contact us at 801-477-7015 to ensure your Camera(s) and or Switch(es) are on line with the new hub:
Once you reach the completed step above, the hub should show two green lights as indicated in the image:

Version 1 Instructions:
Version 1 hubs are being phased out. These instructions are to reset network SSID (Network Name) and password for a version 1 hub. It involves three steps:
- Locate the hub that is offline
- Placing the hub Pairing Mode and connecting to the hub
- Configuring the WIFI
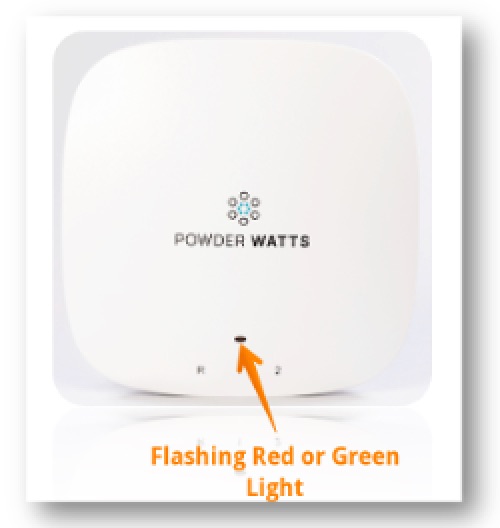
Step 1: Locate the hub that is offline:
This will be indicated by a red or green flashing light on the front of the hub
Step 2: Placing the hub in Paring Mode and connecting to the hub
This involves connecting to a WIFI network, and going to a specific address in your browser on your phone:

Step 3: Configuring WIFI:
Simply enter the Network Name (SSID) and Network Password and press the enter button on the page:

Once complete, the lights on the hub will flash and return to a solid green state. If they are still flashing, Red / Green, retry steps 1 - 3 as your SSID and / or Password are incorrect.
Reset Your Hub Manually
IMPORTANT: Only perform this if instructed. Resetting your hub will cause all settings to be erased and reset to factory defaults.
1- Locate the hub with the correct serial number on the back (there may be more than one hub in your house / building).

2- While holding the #1 Button, press and release the R button (the LED will turn blue) and continue holding the #1 button for about 10 seconds. After releasing the LED will flash green, then red twice quickly, then “breathe red” several times while it is resetting. Once complete it will flash green (roughly half second on, half second off).

Manual Control: How to Use It
Your PowderWatts system is most effective when it is being controlled by our AI-based camera vision technology. However, there may be times when you will desire manual control of the system via your PowderWatts app.
1- Within the app, navigate to the section "All Heat Tape"
2- On the top of this screen, on the right, click the on/off button to turn it on to manual. The button will turn green when manual is activated and will also display the time frame that the manual option will be active for.
3- The large blue button below the manual control option, "Turn On PowderWatts AI," returns control to PowderWatts to have the system begin to be automated again. It can be used at any time to stop manual control.

Why Do My Breakers Keep Tripping
If your circuit breakers are tripping and fuses are blowing, you will need to seek support from an electrician or heat tape installation company. Repeated breaker trips or blown fuses indicate one of the following conditions:
- The heat cable circuit is overloaded for cold starts of the heat cable. This usually presents itself as a humming or buzzing sound when you reset the breaker.
- There is a problem with the heat cable wiring such as nicks or cracks in the heat tape causing it to short out.
- There is a problem with the wiring connections to the heat cable.
- Your circuit breaker is wearing out and needs to be replaced. The PowderWatts system only turns the heat tape on or off just like you would at your breaker panel. We do not vary the amount of electricity used by the heat cable in any way.
If you are experiencing any of these conditions, please contact your preferred licensed electrician.
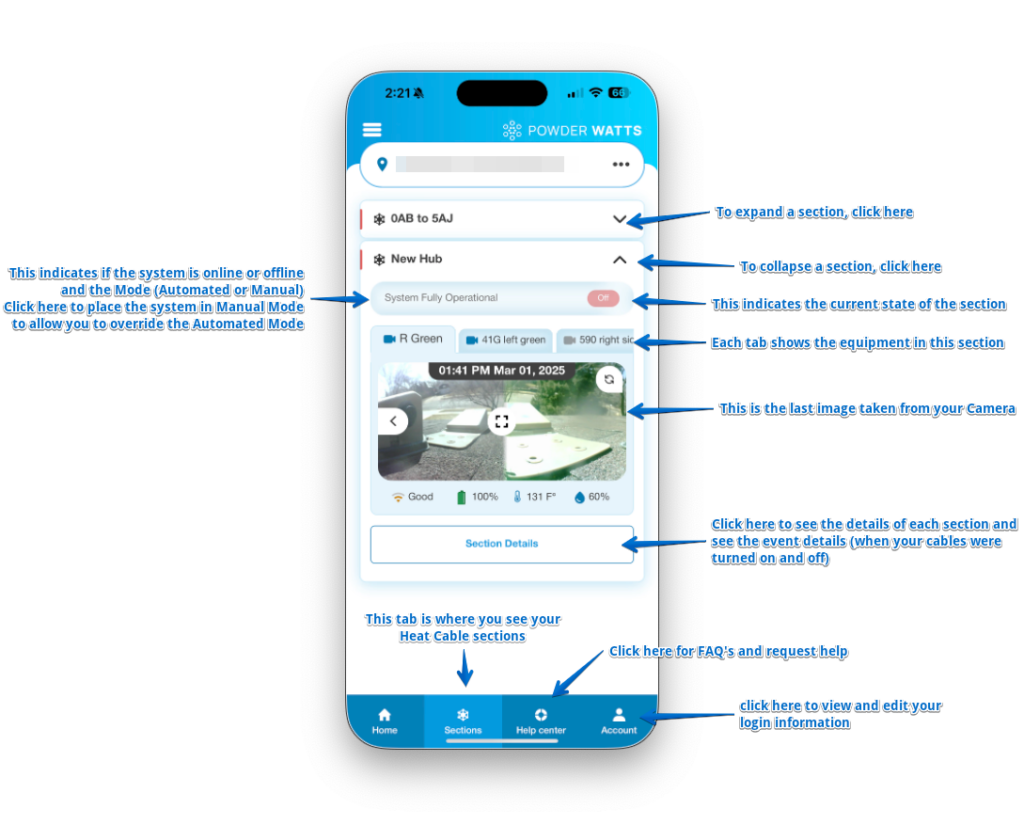
Email says system is offline. The app indicates “System Fully Operational”.
If you receive an email indicating a switch is offline, please open your app and follow the instructions below.
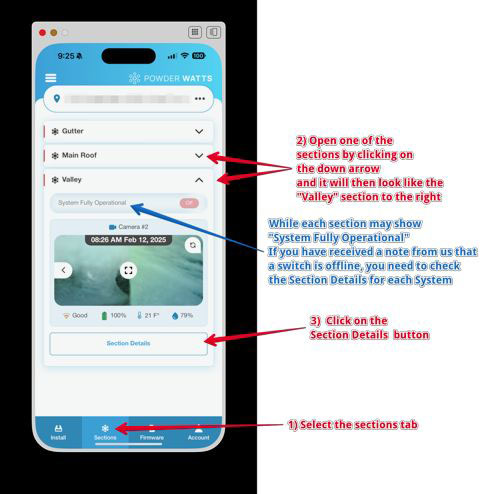
1- Click the selections tab at the bottom of the screen.
2- Open one of the sections of your roof by clicking the "arrow" on the right side of the screen.
3- Inside the section you just opened, you may see a message saying "System Fully Operational."
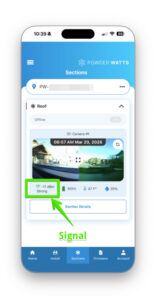
You will need to check the "Section Details" for each part of your system.
4- Click "Section Details" button at the bottom of the screen.
5- In the Section Details page you will check a few details.
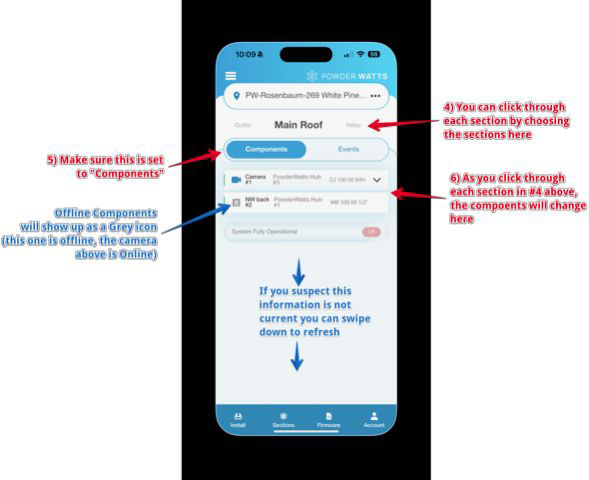
6- Make sure "Components" is selected.
7- Look at the camera icon next to each component. A grey camera icon indicates it is offline. A blue icon indicates it is online and functioning correctly.
8- If you suspect this information is not current, please swipe down to refresh your screen.
9- Repeat steps for each section. (you can click through each section easily by clicking to the next section details at the top of the screen.)
Please also check your circuit breakers to ensure the switch is online. If your breakers have not tripped, please contact us. If your breakers keep tripping, it could be one of the reasons listed below, and you will need to contact your licensed electrician.
- The heat tape circuit is overloaded for cold starts of the heat cable. This usually presents itself as a humming or buzzing sound when resetting the breaker.
- There is a problem with the heat tape wiring, such as nicks or cracks in the heat tape causing it to short out.
- There is a problem with the wiring connections to the heat tape.
- Your circuit breaker is wearing out and needs to be replaced.
The PowderWatts system only turns the heat tape on or off. We do not adjust the amount of electricity applied to the heat cables.
Apple iPhone Login Bug Workaround
This article assists iPhone users with a temporary workaround for a bug we are experiencing during login. We expect to have the fix approved by Apple within two to three weeks.
Step 1: Tap the Login button on the login page.
Step 2: Enter your credentials and press Login.
Step 3: After login, you may land on the main page and see a spinning wheel or an error message.
Step 4: Swipe up from the bottom of your iPhone screen to view all open apps.
Step 5: Find the PowderWatts app preview and swipe it up to fully close it.
Step 6: Return to your Home Screen and reopen the PowderWatts app.
You should now be logged into your location. If you are presented with a Terms & Conditions dialog, check the box and agree. You may need to repeat the swipe-up close and relaunch once more.
We apologize for this bug and any inconvenience it has caused. Please contact us if you need further assistance.
Quick video walkthrough:
Why Are My Heat Cables Buzzing and or Tripping Breakers
Why Are My Heat Cables Buzzing and/or Tripping Breakers?
If you hear buzzing from a heat cable switch — or if a breaker is repeatedly tripping when the system turns on —
it is typically related to how self-regulating (adaptive) heat tape behaves in very cold conditions combined with
how the system was originally sized.
Buzzing and repeated breaker trips are not cosmetic issues.
They indicate elevated electrical load during startup and should be addressed using one of the corrective options outlined below.
How Self-Regulating Heat Tape Works
All modern self-regulating heat tape behaves the same way:
- When the cable is very cold, it naturally draws more electrical current.
- As it warms up, it automatically draws less current.
This is how the cable regulates its own temperature. When energized from a fully cold condition,
the initial current draw can be significantly higher than its steady operating load.
Why Installation Design Matters
When heat cable systems are originally installed, the amount of cable placed on each breaker is often influenced by:
- The project budget
- The number and size of available electrical circuits
- The assumption that the heat tape would run continuously from roughly October through March
To reduce installation cost, longer stretches of heat tape are sometimes connected to a single breaker
rather than adding additional circuits. That design approach assumes continuous winter operation.
When heat tape runs continuously:
- It stays warm
- It avoids true cold starts
- It remains within a narrower electrical range
However, continuous operation means a circuit may draw
10–20 amps every hour, 24 hours a day, all winter long
— whether melting is needed or not.
That 24×7 operation leads to:
- Higher electricity bills
- Unnecessary energy consumption
- Increased long-term wear on the heat cable
Modern on-demand control systems eliminate that continuous winter load. The system energizes heat cables
only when melting conditions require it, reducing both energy cost and long-term stress on the cable.
Why Buzzing Happens
When a long run of heat tape that was sized under the “always on” assumption is energized from a fully cold state,
the startup current can approach the upper limit of the breaker or switching device.
That elevated load can cause:
- Audible buzzing from the switch
- Electrical vibration within contactors
- Increased mechanical stress on components
Buzzing indicates the circuit is experiencing high amperage during startup. While it does not automatically mean
the system is unsafe, it does indicate that the circuit is operating near its design limits and should be corrected.
Why Breakers May Trip — Especially Repeatedly
If a breaker trips when the system starts — or trips repeatedly during cold weather — it means the circuit
is exceeding its allowable startup load.
Repeated breaker trips typically indicate:
- The heat tape length on that circuit is oversized for cold-start conditions
- The breaker is operating too close to its rated capacity
- The installation assumed continuous winter energizing
Breaker trips are a protective mechanism. They prevent overheating and protect wiring and equipment.
Repeated trips are not a switch failure — they are a circuit sizing issue that must be addressed.
Corrective Options
- Leave the heat tape energized continuously during winter.
This eliminates cold starts and often eliminates buzzing or breaker trips —
but restores continuous 24×7 electrical draw, higher energy costs, and increased cable wear. - Install a current-balancing or soft-start device.
Where circuits branch, startup load can be managed to reduce surge demand and electrical stress. - Divide longer runs into smaller circuits (most permanent solution).
Breaking oversized runs into shorter sections reduces cold-start amperage
and aligns the installation with modern on-demand operation.
Bottom Line
Buzzing or repeated breaker trips during startup indicate elevated electrical load.
They are usually the result of:
- The normal cold-weather behavior of self-regulating heat tape
- Combined with installation designs that assumed continuous winter energizing
Modern on-demand control eliminates unnecessary 24×7 operation — reducing energy bills and extending cable life —
but may reveal sizing limitations in older installations.
If you are hearing persistent buzzing or receiving repeated breaker alerts, the issue should be addressed
using one of the corrective options above. Please contact support so we can review your specific circuit
configuration and implement the appropriate solution.
Getting Started
Quick Start
STEP 1: Pay your activation fee and enter a payment method for your monthly subscription.
STEP 2: Enter the email address you gave your installer team
STEP 3: Check your email for verification from PowderWatts. Use the link in the verification email to pay your activation fee and update your monthly payment method.
STEP 4: Download and install the app.


STEP 5: Use your email address again and create your app login.
STEP 6: You have joined the PowderWatts community and are now ready to watch the energy saving begin.
Rebate: Rocky Mountain Power
A Rocky Mountain Power rebate on your PowderWatts can help you stick to your winter energy-saving goals
Residential customers in the state of Utah can receive a $500 per installed switch from Rocky Mountain Power under the WATTSMART rebate program up to a maximum of 2 switches (or $1000) per home. This rebate is:
- Considered a timer under the WATTSMART program for residential customer
- Is payable directly to homeowners after completion of an installation by PowderWatts (or their contractors)
This rebate can be applied for by the homeowner on the WattSmart Rocky Mountain Power Rebate Application site and filling out a Rooftop Heat Tape Timer Application.
To complete this application you will need a copy of your paid PowderWatts (or authorized WattSmart contractor) invoice. For a copy of your PowderWatts Installation invoice you may go to our customer portal by clicking here
Full WattSmart Residential Heat Tape Timer rebate details can be viewed here
Reset Your Password
Create a Login
Creating a login for the first time on the app is simple.
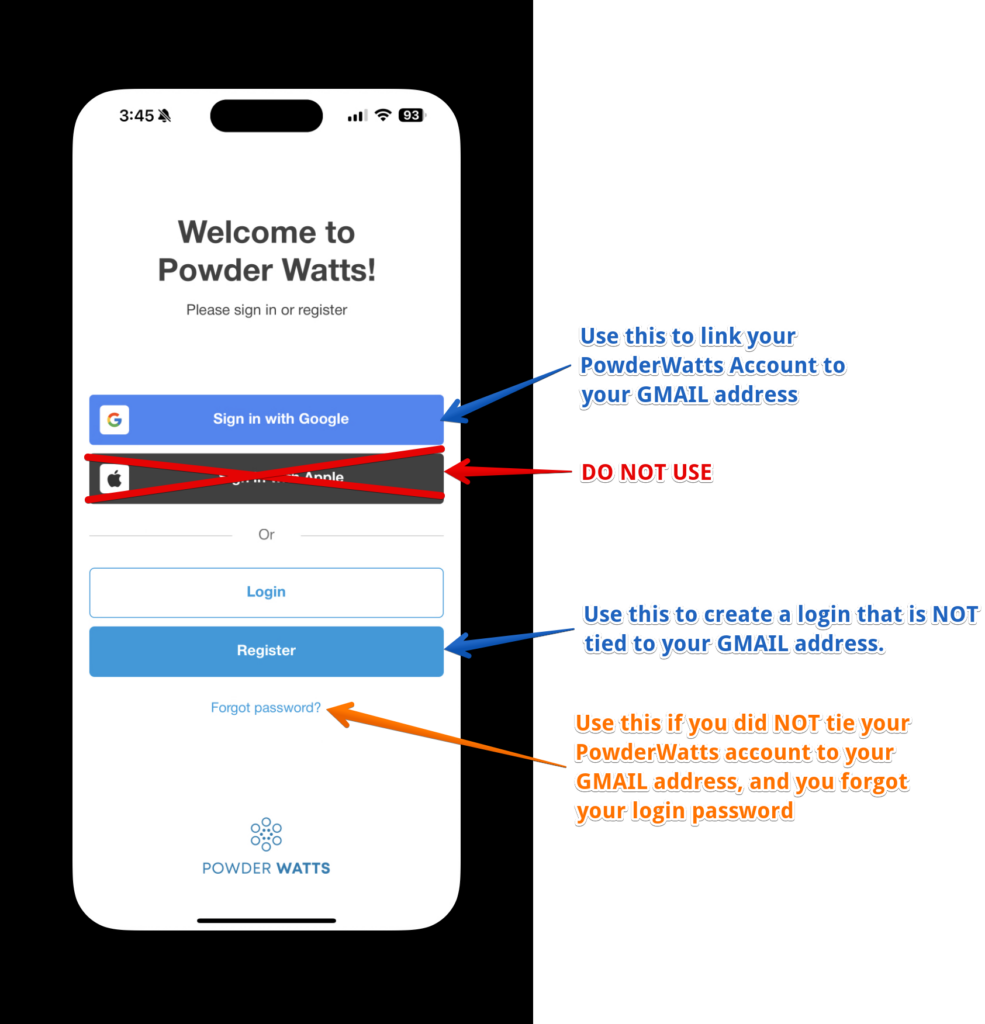
Gmail based email addresses: Click the "Sign in with Google" button to link your GMAIL address to your Google account.
****DO NOT USE THE "LOG-IN WITH APPLE" FEATURE.****
Non-Gmail based email addresses: Click the "Register" button to create a login with an email address that is NOT a Gmail address.
Reset Your Password
Non-Gmail based email addresses: If you are using an email that is NOT a Gmail account and need to reset you password, click the "Forgot Password" to go thru the simple processs of resetting your non-gmail based email address password.
IF you are using a Gmail based address, password changes are completed thru your Google account.
Create a Login
STEP 1: Download and install the app from the appropriate link below.
|
|
STEP 2: After installing the app you will need to create a login. Open the app on your phone. You will see a screen like the following:
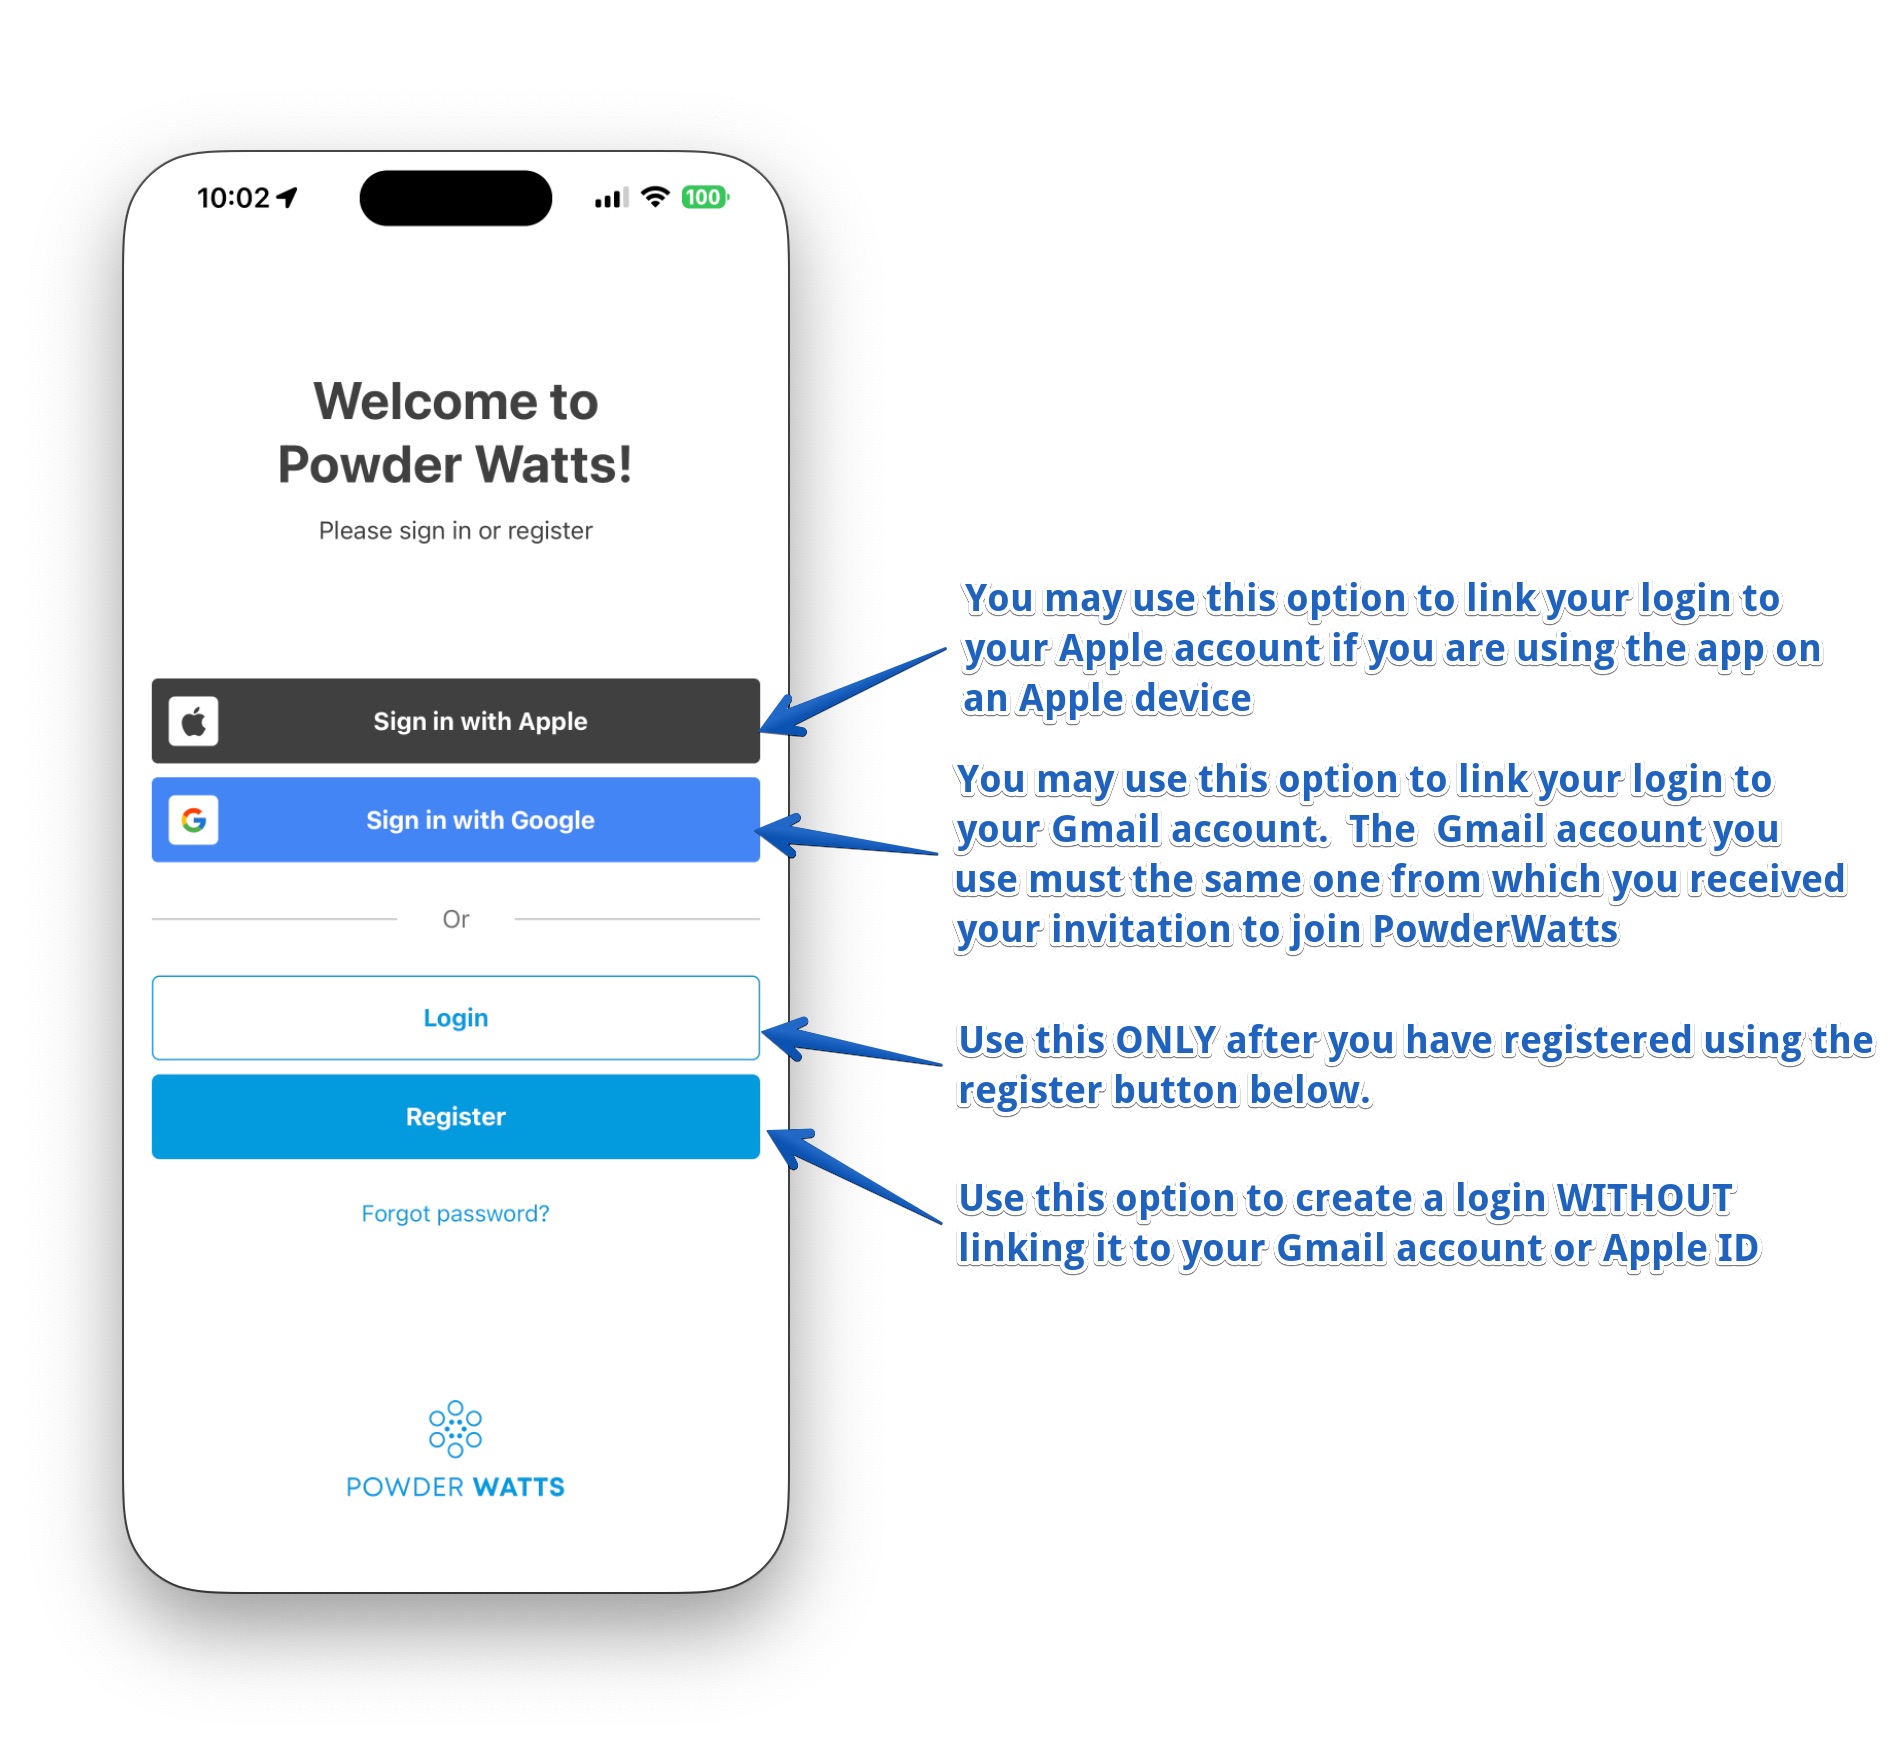
STEP 3: If linking your Gmail account, follow the prompts and verifications provided by Google. If creating a Login directly with PowderWatts you will see the following screen when you click on Register.
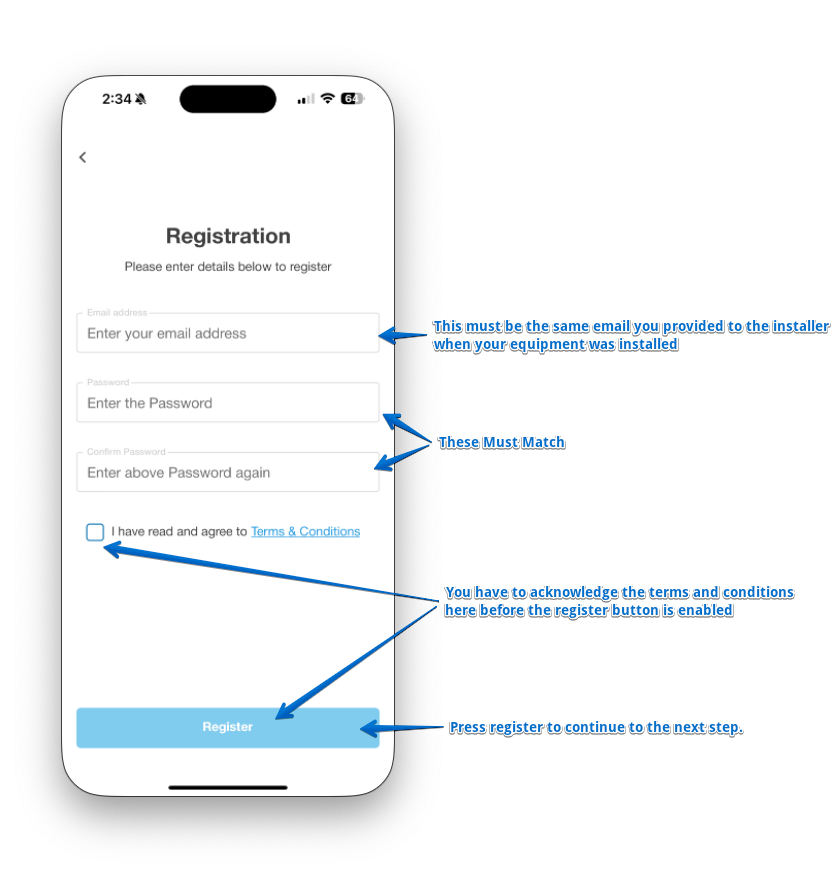
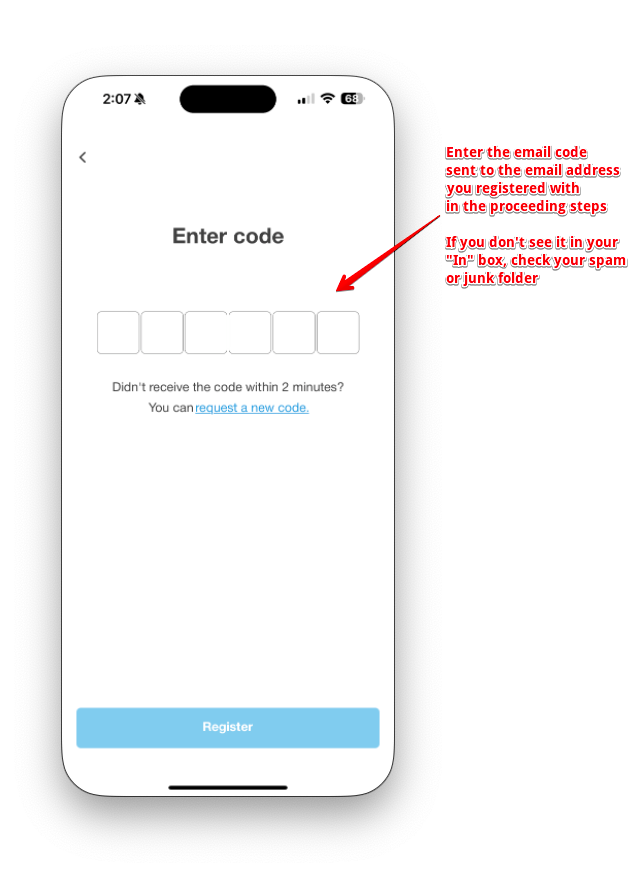
STEP 4: You will receive the following verification screen, if you are creating a login directly with PowderWatts. If you have linked your Gmail account, you will not receive this screen. Instead, you will receive a screen to accept the terms and conditions and then proceed to STEP 5.
STEP 5: After registering and accepting the terms and conditions, you will be presented with the Home screen. We have provided a brief overview of the main Sections tab as a primer. For more information about the other tabs and subjects such as how to manually control your cables, see our FAQ’s at: PowderWatts.com/FAQS