For Installers
Camera Installation Training
In this training, we'll walk you through the steps to properly install a Powder Watts camera, including adding it to the Powder Watts app, connecting it to the hub, and attaching it to the roof.
Before you begin, make sure you have the following items on hand:
- Powder Watts camera
- Powder Watts app (available for download from the App Store or Google Play)
- Powder Watts hub
- Ladder
- Screwdriver
- Gasketed screws
With these items ready, let's get started.
Step 1: Scan the QR code to add the camera to the Powder Watts app. To do this, open the Powder Watts app and select "Add Camera." Hold your phone's camera up to the QR code on the back of the camera, and follow the prompts to add it to the app.
Step 2: Wake up the camera. To wake up the camera, hold a magnet next to the semi-circle on the side of the camera. This will turn on the camera and connect it to the Powder Watts hub.
Step 3: Test the camera. Before attaching the camera to the roof, make sure it is operational and taking images from the desired location. You can do this by checking the app to see if the camera's image is transmitting properly after waking the camera up for it to take an image.
Step 4: Place the camera in the desired location. Choose a location that will capture the worst ice dams for that section of heat cable. Each section should have its own camera.
Step 5: Attach the camera to the roof. Position the camera at the top of a heat cable loop, and attach it to the roof using the gasketed screws and adding sealant around each screw before setting the camera. One screw should be placed in the front hole, and one in any of the four back holes. Make sure the camera is secure and flush and the back flap of the camera should go under a roof shingle.
Step 6: Test the camera again. After attaching the camera to the roof, test it again to make sure the image is coming through properly in the app.
You have successfully installed a Powder Watts camera. If you have any questions or need additional assistance, don't hesitate to reach out to our customer support team.
Troubleshooting
How do I update my account?
To update your account please click the button below to be directed to the Customer Portal.

Manually control your heat cables
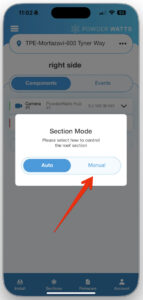
1- Select the sections tab at the bottom of the screen and then tap the button for the section you want to turn on

2- Click on Manual mode. This will change your system from being managed by PowderWatts, to being managed manually by you.
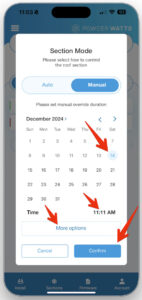
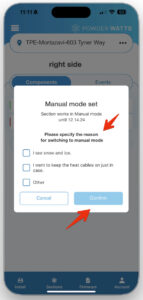
3- Select how long you want your system to be in manual mode, by selecting the end date and end time.
Note: the end time is selectable. Simply click on the time it is showing to select a new time. It defaults to 10 minutes but you can set any time you want. To set your system to manual mode indefinitely, select the More Options button and an option to set the system to manual mode indefinitely will be visible. Once you have your end date and time selected, press confirm.
Date Selection-
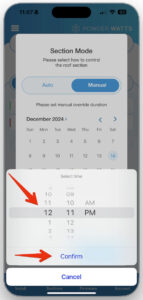
Time Selection-
4- Select a reason for switching to manual and press confirm.
5- You can now manually control your heat cable by using the on off button (Red Arrow below)
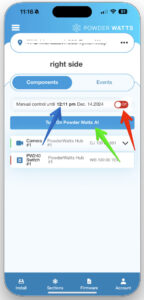
NOTE: Although it may give you options to turn the cables on for a period of time, you must manually turn them on or off. The timer function does not presently work. Your heat cables will be in manual control until the time specified (Blue Arrow). This is the time you selected in the steps above. At the end of this time, control will revert to Powder Watts to control your cables. To return your cables to automated control by PowderWatts, select the Turn On Powder Watts AI button (Green Arrow).
Resetting Your HUB SSID
Instructions to reset the SSID (Network Name) and Password for a PowderWatts Hub.
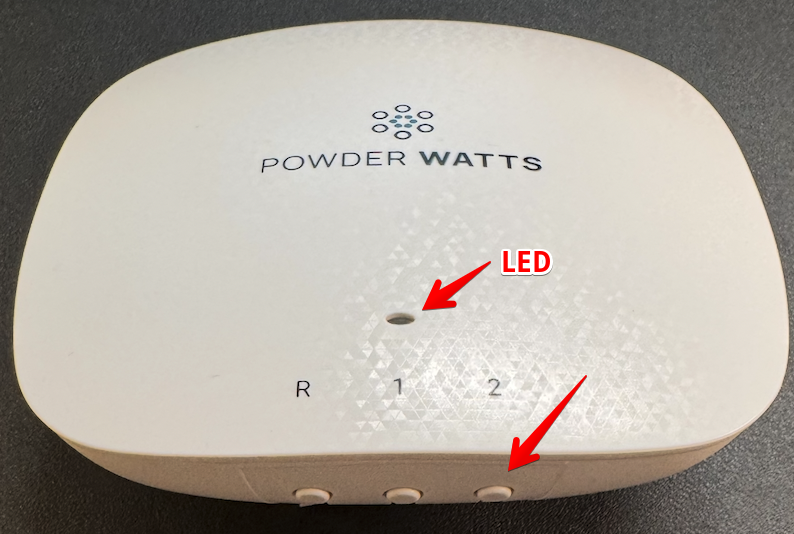
1- Locate the hub that is offline. This will be indicated by a red or green flashing light on the front of the hub.
2- Press the #2 button once. This will place the hub in paring mode. This will be evident by a green flashing light (roughly half second on half second off).
•••Powder watts equipment only works with 2.4 ghz networks. If you have 5 ghz wifi it will not work. Please ensure you are configuring your hub for a 2.4 ghz network
3- Next, on your phone, go to your WIF settings and select the device that is named PWHUB-58:47:ca:a0:XX:XX (the X will be different for each hub and should match the last four digits on the back of the hub for the number starting with 58:47:ca:a0: (the second line of numbers on the sticker))

4- Now open a browser on your phone and type in 192.168.0.1 in the address bar and press enter / go:

5- That will bring up the following screen. On this screen type the name of your network, the password and press Submit. Once complete you will see the hub light flash red, then green then steady green once it has joined the network. Within an hour the Switches and cameras that are connected to the hub will report in and show as on-line in your app.

If you have any issues, please contact us for assistance.
Reset Your Hub Manually
IMPORTANT: Only perform this if instructed. Resetting your hub will cause all settings to be erased and reset to factory defaults.
1- Locate the hub with the correct serial number on the back (there may be more than one hub in your house / building).

2- While holding the #1 Button, press and release the R button (the LED will turn blue) and continue holding the #1 button for about 10 seconds. After releasing the LED will flash green, then red twice quickly, then “breathe red” several times while it is resetting. Once complete it will flash green (roughly half second on, half second off).

Manual Control: How to Use It
Your PowderWatts system is most effective when it is being controlled by our AI-based camera vision technology. However, there may be times when you will desire manual control of the system via your PowderWatts app.
1- Within the app, navigate to the section "All Heat Tape"
2- On the top of this screen, on the right, click the on/off button to turn it on to manual. The button will turn green when manual is activated and will also display the time frame that the manual option will be active for.
3- The large blue button below the manual control option, "Turn On PowderWatts AI," returns control to PowderWatts to have the system begin to be automated again. It can be used at any time to stop manual control.

Why Do My Breakers Keep Tripping
If your circuit breakers are tripping and fuses are blowing, you will need to seek support from an electrician or heat tape installation company. Repeated breaker trips or blown fuses indicate one of the following conditions:
- The heat cable circuit is overloaded for cold starts of the heat cable. This usually presents itself as a humming or buzzing sound when you reset the breaker.
- There is a problem with the heat cable wiring such as nicks or cracks in the heat tape causing it to short out.
- There is a problem with the wiring connections to the heat cable.
- Your circuit breaker is wearing out and needs to be replaced. The PowderWatts system only turns the heat tape on or off just like you would at your breaker panel. We do not vary the amount of electricity used by the heat cable in any way.
If you are experiencing any of these conditions, please contact your preferred licensed electrician.
Email says system is offline. The app indicates “System Fully Operational”.
If you receive an email indicating a switch is offline, please open your app and follow the instructions below.
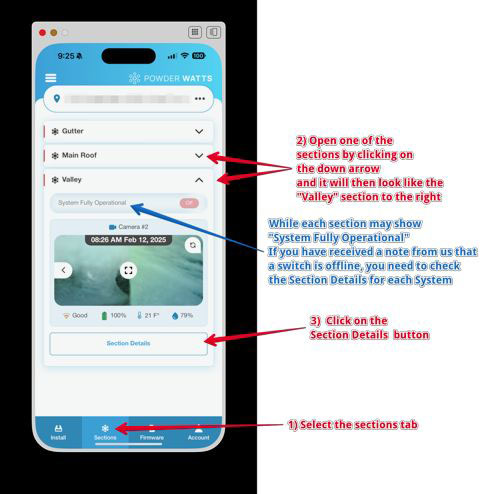
1- Click the selections tab at the bottom of the screen.
2- Open one of the sections of your roof by clicking the "arrow" on the right side of the screen.
3- Inside the section you just opened, you may see a message saying "System Fully Operational."
You will need to check the "Section Details" for each part of your system.
4- Click "Section Details" button at the bottom of the screen.
5- In the Section Details page you will check a few details.
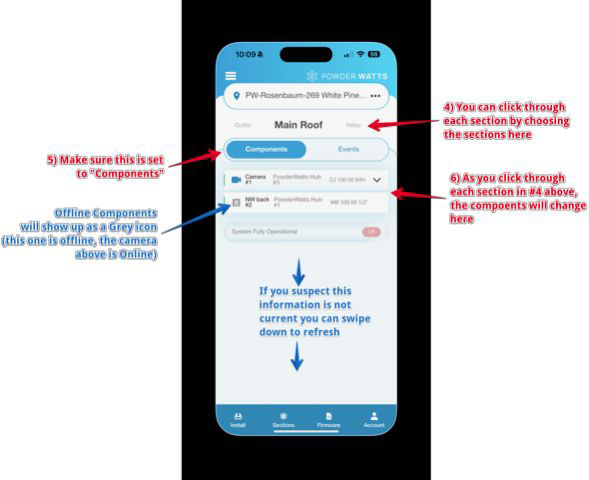
6- Make sure "Components" is selected.
7- Look at the camera icon next to each component. A grey camera icon indicates it is offline. A blue icon indicates it is online and functioning correctly.
8- If you suspect this information is not current, please swipe down to refresh your screen.
9- Repeat steps for each section. (you can click through each section easily by clicking to the next section details at the top of the screen.)
Please also check your circuit breakers to ensure the switch is online. If your breakers have not tripped, please contact us. If your breakers keep tripping, it could be one of the reasons listed below, and you will need to contact your licensed electrician.
- The heat tape circuit is overloaded for cold starts of the heat cable. This usually presents itself as a humming or buzzing sound when resetting the breaker.
- There is a problem with the heat tape wiring, such as nicks or cracks in the heat tape causing it to short out.
- There is a problem with the wiring connections to the heat tape.
- Your circuit breaker is wearing out and needs to be replaced.
The PowderWatts system only turns the heat tape on or off. We do not adjust the amount of electricity applied to the heat cables.
Getting Started
Quick Start
STEP 1: Pay your activation fee and enter a payment method for your monthly subscription.
STEP 2: Enter the email address you gave your installer team
STEP 3: Check your email for verification from PowderWatts. Use the link in the verification email to pay your activation fee and update your monthly payment method.
STEP 4: Download and install the app.


STEP 5: Use your email address again and create your app login.
****IF YOU ARE USING AN IPHONE TO LOG-IN, DO NOT USE THE "LOG-IN WITH APPLE" FEATURE.****
STEP 6: You have joined the PowderWatts community and are now ready to watch the energy saving begin.
Rebate: Rocky Mountian Power
A Rocky Mountain Power rebate on your PowderWatts can help you stick to your winter energy-saving goals
Get a cash-back rebate when you invest in a PowderWatts system. Our system automatically turns your heat tape off when it’s not needed and helps ensure your roof stays safe and your energy bills stay low.
Rebates and qualifications
To ensure home qualifies:
- Must be existing single family or manufactured home, not new construction.
- Home must have heat tape installed on the home’s roof.
Requirements for a PowderWatts system:
- PowderWatts system must be new at the time of installation.
- Work must be completed by a program participating contractor.
- PowderWatts system must be installed according to specifications outlined in the Utah Technical Specifications Manual.
Additional program rules:
- Submit all documents so they are received within 180 days of the qualifying service completion.
- Homes are eligible for one unit. If a customer is applying for two units or more, please contact the program before applying as confirmation of linear feet of heat tape and or additional information is required.
- If applying for a multifamily property (up to 3 units per foundation), please submit one application per unit. For properties with 4 or more units, please see our custom Multifamily Program.
Required documents for online submission:
- PowderWatts , Completed and Submitted
- Itemized receipt or contractor invoice.
- Third party payment addendum for applicants who would like to forward payment to a third party not listed on the utility account.
Rebates are associated with the most recent tariff filing approved by the Utah Utilities and Transportation Commission. All rebates are subject to change with 45 days’ notice. Additional terms and conditions apply.
Customer eligibility
Residential electric customers residing in the state of Utah who purchase their electricity from Rocky Mountain Power on rate schedules 1, 2, or 3 qualify. Landlords who own rental properties served by the company in the state of Utah where the tenant is billed on rate schedules 1, 2 or 3 also qualify for this program. You can locate your rate schedule on your bill or by calling 1-888-221-7070.
Application details
Prior to starting a project, find a program participating contractor. Note that select rebates must be completed by a Program-Qualified Contractor. Review the rebate qualifications with your Contractor and review the list of required documents to submit for an rebate.
You will need these items to apply online for your rebate:
- Rocky Mountain Power account number.
- Electronic image of your receipt that shows the manufacturer name and model number of your new product.
Important details:
- Complete and submit your online application within 180 days of purchasing your new energy-efficient product.
- Please allow 14 days plus mail service time for delivery of your rebate after your application and receipt has been received and approved. Missing information may delay processing and delivery of your rebate.
- You can locate your account number on your statement.
Reset Your Password
Create a Login
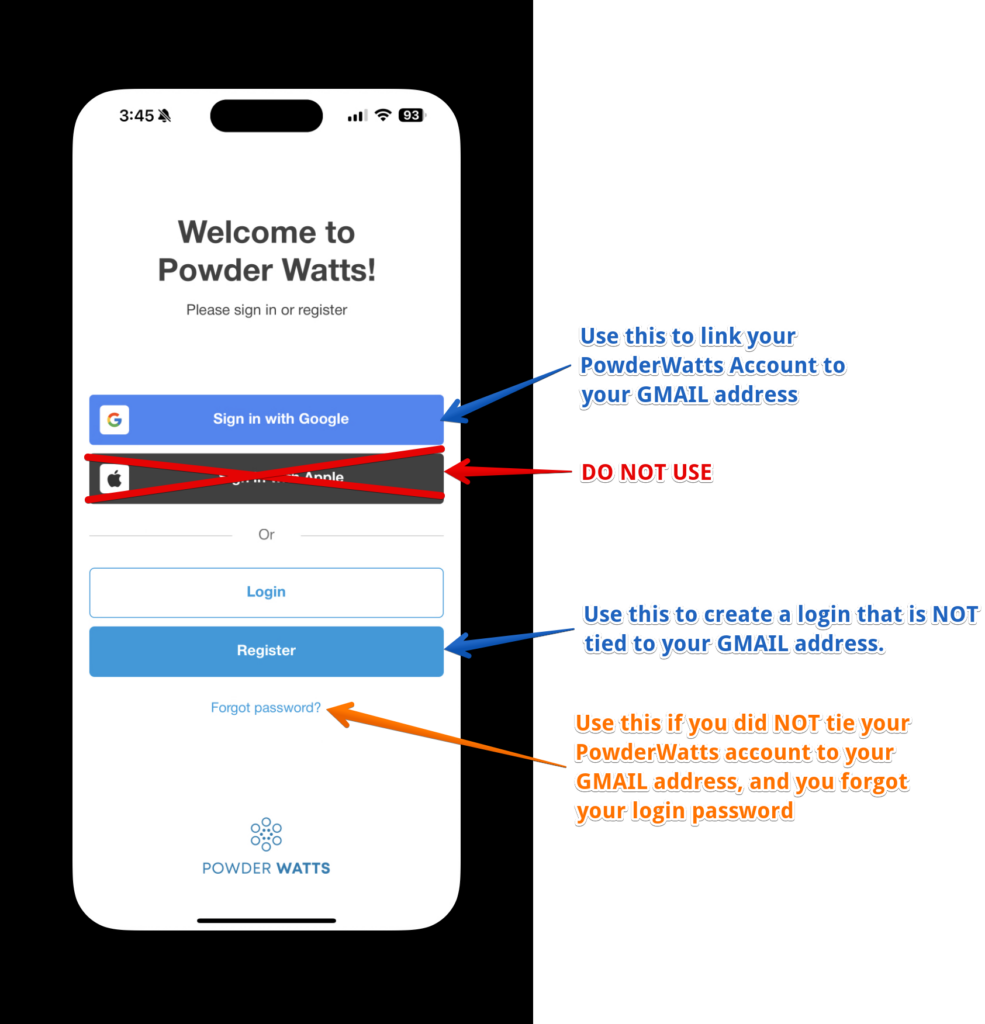
Creating a login for the first time on the app is simple.
Gmail based email addresses: Click the "Sign in with Google" button to link your GMAIL address to your Google account.
****DO NOT USE THE "LOG-IN WITH APPLE" FEATURE.****
Non-Gmail based email addresses: Click the "Register" button to create a login with an email address that is NOT a Gmail address.
Reset Your Password
Non-Gmail based email addresses: If you are using an email that is NOT a Gmail account and need to reset you password, click the "Forgot Password" to go thru the simple processs of resetting your non-gmail based email address password.
IF you are using a Gmail based address, password changes are completed thru your Google account.
Create a Login
STEP 1: Download and install the app from the appropriate link below.
STEP 2: After installing the app you will need to create a login. Open the app on your phone. You will see a screen like the following:
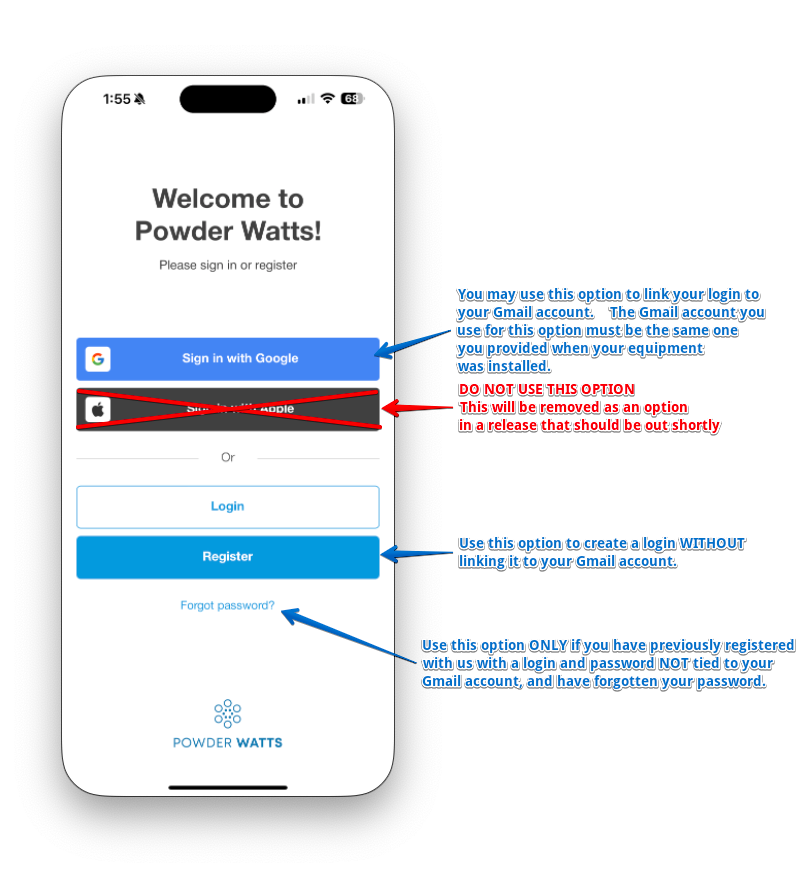
STEP 3: If linking your Gmail account, follow the prompts and verifications provided by Google. If creating a Login directly with PowderWatts you will see the following screen when you click on Register.
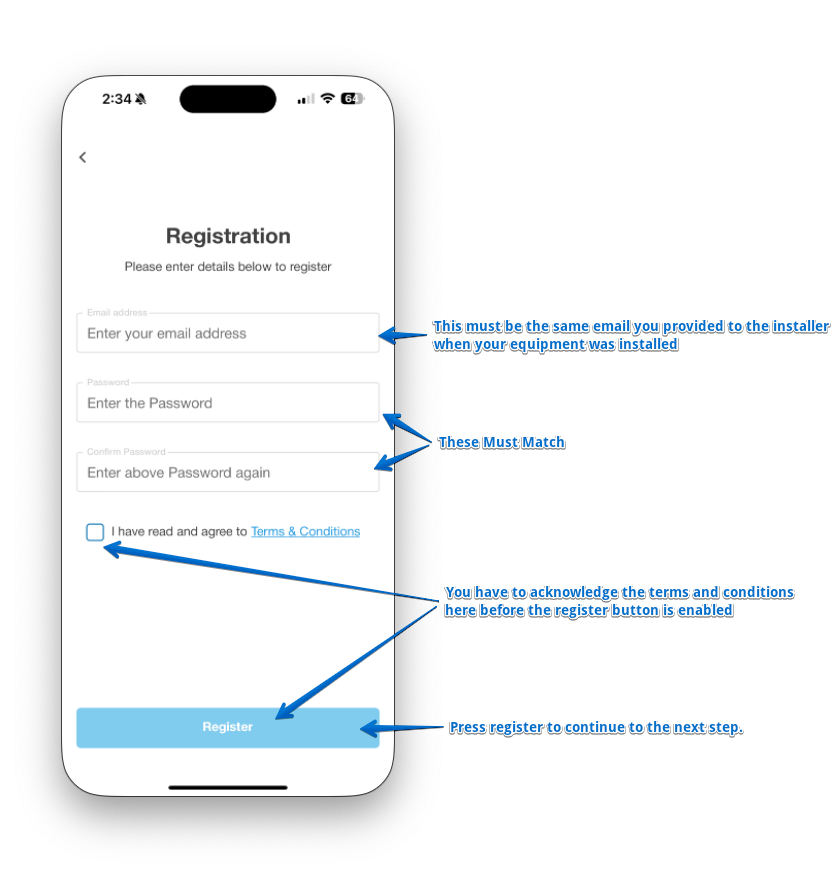
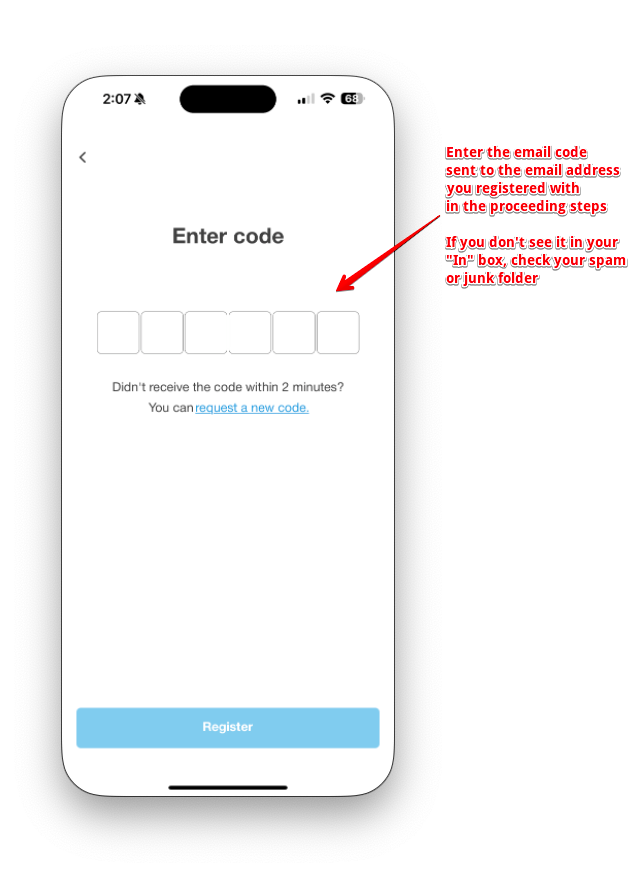
STEP 4: You will receive the following verification screen, if you are creating a login directly with PowderWatts. If you have linked your Gmail account, you will not receive this screen. Instead, you will receive a screen to accept the terms and conditions and then proceed to STEP 5.
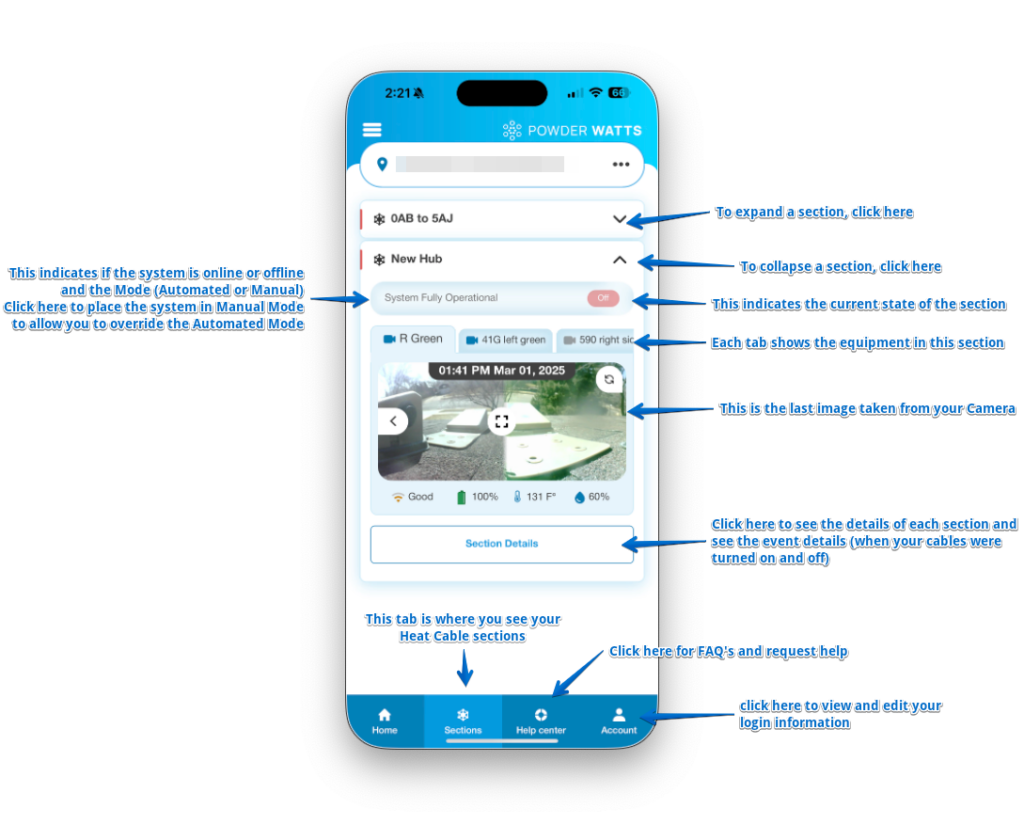
STEP 5: After registering and accepting the terms and conditions, you will be presented with the Home screen. We have provided a brief overview of the main Sections tab as a primer. For more information about the other tabs and subjects such as how to manually control your cables, see our FAQ’s at: PowderWatts.com/FAQS